How to Draw a Desk A Step-by-Step Manual
How to Draw a Desk. The humble desk is furniture that many of us use daily. There’s a chance you’re looking at this guide while sitting at a desk! They can be used for work, creative projects, or reading a book, to name a few. With so many possibilities for using a desk.
It can also be fun to represent these possibilities by learning how to draw a desk. With the guide you are about to do, you will see how you can do it! So why not pull up a chair to your favorite desk and enjoy this step-by-step guide on drawing a desk?
How to Draw a Desk – let’s Get Started!
Step 1
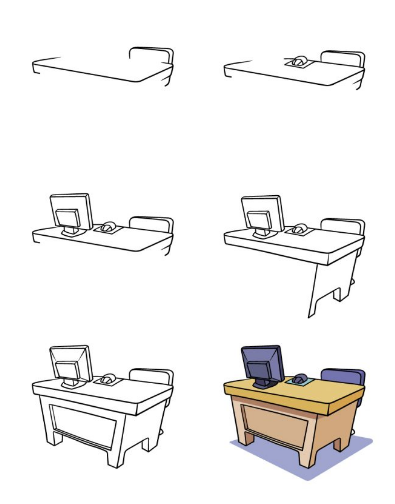
For this guide on drawing a desk, you may want to have a ruler handy as you will be drawing many straight lines for this image. For the desktop, we’ll draw a computer monitor and mouse on the surface. But for now, we will focus on the outline of the desktop. Using the ruler, we will draw the beginning of the desktop surface. which will be slightly inclined.
We’ll draw some rounded corners for the desk and then use some larger rounded lines for the chair at the table. At the end of this step, there will still be a space left on the top left of the desktop, but we’ll fill that up soon in the next few steps.
Step 2
We will draw the first object on the desktop for the next part of your desktop drawing. This object will be a computer mouse drawn in a small round shape. Next, we’ll use some short, straight lines for the mouse pad you’re sitting on.
Then using your ruler, you can extend the line from the mouse to the right corner of the desktop to fill that gap. There will still be a space to the mouse’s left, but we’ll fill that space in the next step.
Step 3
The second object we will draw in this guide on drawing a desk will be a thin computer monitor place on the desk. This will fill that gap we’ve mentioned several times, and you can use your ruler again for this part. You can draw a large square with some lines outside to start a 3D effect and then draw another smaller square inside for the back of the monitor. You can then use some straight and curved lines for the monitor base.
Step 4
We’ll leave the desktop surface for a moment, and for this part of drawing your desktop, we’ll concentrate on the desktop’s outline. First, you can use your ruler to fill in the line on the edge of the desk in front of us and then add a small vertical line for the corner. Then we’ll use a few more straight lines on the right side for the side and legs of the desk. You’ll be ready for some final details in the next step on our reference image.
Step 5
This fifth step of our guide on how to draw a desk will be all about adding the final details and elements before adding some color in the final step. To do this, we’ll use that ruler again to draw the back of the desk. . We’ll also look at the legs of the desk in this step, and you can draw some rectangular shapes in this section to add even more depth to this desk.
Finally, you can draw a few more straight lines on the back of the computer screen. Then you are ready to carry on to the last step! Before doing so, you can also add some details of your own. Maybe you could show us what you would keep on this desk. In real life, it’s usually best to keep a clean and tidy desktop, but maybe for this one, you could have some fun creating a chaotic mess of objects! We look forward to seeing what creative ideas you come up with for this image.
Step 6
You have reached the final step of this desktop drawing, and this is the step where you can unleash your favorite colors on your drawing! We show you one way you can color your image in our example image, but feel free to use any color you like.
Then you can experiment with your favorite art tools and media to help bring the colors to life. If you drew some different objects on the desktop, that could be a great way to bring color variation to the image. Be certain to have fun with it, and you’ll be shocke at what can ensue!

